


Demystifying the Ping Command: A Simple Guide to Testing Your Network Connection
The internet keeps our world connected, but sometimes that connection sputters. The “ping” command is a handy tool to diagnose these issues. This guide will explain what ping does, how to use it, and answer some frequently asked questions.
What is Ping?
Imagine tossing a pebble across a pond. The ripples spreading outward are similar to a ping command. Ping sends data packets to a specific device (website or another computer) and waits for a response. The response time (measured in milliseconds) indicates the health of your connection.
Why Use Ping?
- Diagnose Network Issues: Slow internet speeds or connection drops? Ping can help pinpoint the problem. Slow or missing responses suggest issues between your device and the destination.
- Identify the Culprit: Is it your internet service provider (ISP), your router, or the website itself? Pinging different targets can help isolate the problem source.
- Test Network Performance: Regular pings can be a basic network performance monitoring tool. Consistent response times indicate a stable connection.
How to Use Ping:
- Open Command Prompt (Windows) or Terminal (Mac/Linux): Search for “Command Prompt” on Windows or open “Terminal” on Mac/Linux.
- Type ping followed by the website address or IP address: For example, ping google.com or ping 8.8.8.8 (Google’s public DNS server).
- Press Enter: The ping command will send packets and display the response times.
FAQs on Using Ping:
- What is a good ping time? Generally, ping times below 100ms are considered good. However, it can vary depending on your location and internet connection.
- What if I get high ping times? High ping times could indicate congestion, distance to the server, or issues with your ISP.
- Is a ping the same as a speed test? No. Ping measures response time, while speed tests measure download and upload speeds.
Remember: Ping is a basic but valuable tool for diagnosing basic network connectivity issues. It can help you identify where problems might lie and troubleshoot your internet woes.
How To Us? Ping on Windows and Mac
The ping command is a helpful network diagnostic tool available on both Windows and Mac computers. Here’s a breakdown on how to use it on each operating system:
For Windows:
- Open Command Prompt: Click on the Start menu and search for “Command Prompt.” Alternatively, press the Windows key + R, type “cmd” and press Enter.
- Type ping followed by the website address or IP address: For example, type ping google.com or ping 8.8.8.8 (Google’s public DNS server).
- Press Enter: The ping command will send packets and display the response times.
For Mac:
- Open Terminal: Go to Applications > Utilities > Terminal.
- Type ping followed by the website address or IP address: Similar to Windows, type ping google.com or ping 8.8.8.8.
- Press Enter: The ping command will send packets and display the response times.
Understanding the Results:
Both Windows and Mac will display similar ping results. Look for lines like:
Reply from [address]: bytes=32 time=45ms TTL=64 This indicates a successful ping response. The number following “time” is the round-trip time in milliseconds (ms). Lower times are better.
Request timed out. This means no response was received, suggesting a connection issue.
Remember: The steps and output format for ping are very similar on both Windows and Mac. So, with this knowledge, you can troubleshoot network issues on either system!
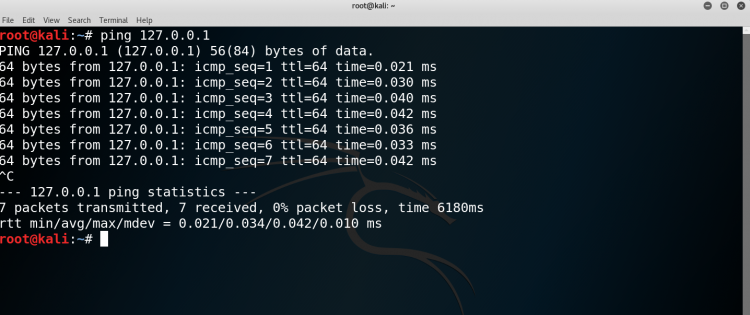
PING (Packet Internet Groper) command is used to check the network connectivity between host and server or host. The ping command verifies IP-level connectivity to another TCP/IP computer by sending Internet Control Message Protocol (ICMP) echo Request messages.
The receipt of corresponding echo Reply messages are displayed, along with round-trip times. ping is the primary TCP/IP command used to troubleshoot connectivity, reachability, and name resolution, the Ping Command is usually used as a simple way to verify that a computer can communicate over the network with another computer or network device.
For example if we want to connect to some network then firstly we will check whether the network is online i.e responding back to ping command or not, and if it is not responding to command so we will find the reason whether the network is offline or some firewall is being installed which is blocking the ping command. Then we will use another type of commands to find the reason of no response.
Also Read- Learn TCP/IP
ping will report duplicate and damaged packets. Duplicate packets should never occur, and seem to be caused by inappropriate link-level re-transmissions. Duplicates may occur in many situations and are rarely (if ever) a good sign, although the presence of low levels of duplicates may not always be cause for alarm.
Damaged packets are obviously serious cause for alarm and often indicate broken hardware somewhere in the ping packet’s path (in the network or in the hosts).
Ping Command Syntax
ping [-t] [-a] [-n count] [-l size] [-f] [-i TTL] [-v TOS] [-r count] [-s count] [-w timeout] [-R] [-S srcaddr] [-p] [-4] [-6] target [/?]
-t Using this option will ping the target until you force it to stop
-a This ping command option will resolve, if possible, the host name of an IP address target.
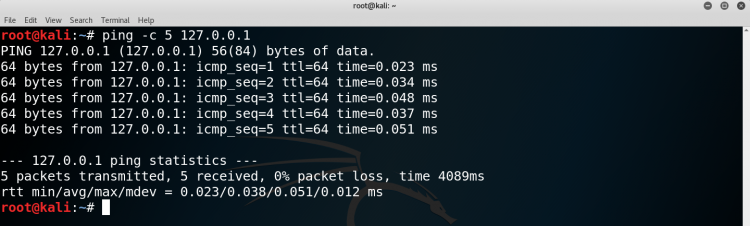
-n count This option sets the number of ICMP Echo Requests to send, from 1 to 4294967295. The ping command will send 4 by default if -n isn’t used.
-l size Use this option to set the size, in bytes, of the echo request packet from 32 to 65,527. The ping command will send a 32-byte echo request if you don’t use the -l option.
-f Use this ping command option to prevent ICMP Echo Requests from being fragmented by routers between you and the target. The -f option is most often used to troubleshoot Path Maximum Transmission Unit (PMTU) issues.
-i TTL This option sets the Time to Live (TTL) value, the maximum of which is 255.
-r count Use this ping command option to specify the number of hops between your computer and the target computer or device that you’d like to be recorded and displayed.
-s count Use this option to report the time, in Internet Timestamp format,.
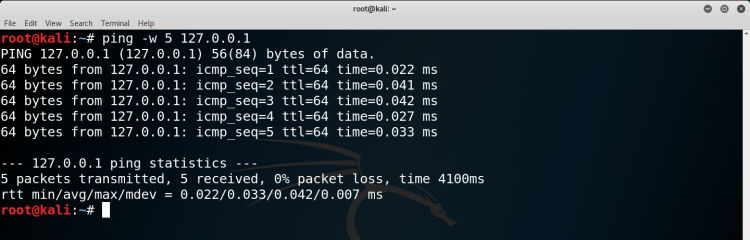
-w timeout Specifying a timeout value when executing the ping command adjusts the amount of time, in milliseconds, that ping waits for each reply.
-R This option tells the ping command to trace the round trip path.
-S srcaddr Use this option to specify the source address.
-p Use this switch to ping a Hyper-V Network Virtualization provider address.
-4 This forces the ping command to use IPv4 only but is only necessary if target is a hostname and not an IP address.
-6 This forces the ping command to use IPv6 only but as with the -4 option, is only necessary when pinging a hostname.
target This is the destination you wish to ping, either an IP address or a hostname.
Some basic functions:
Pinging the host for availability:- check if a host is alive or not
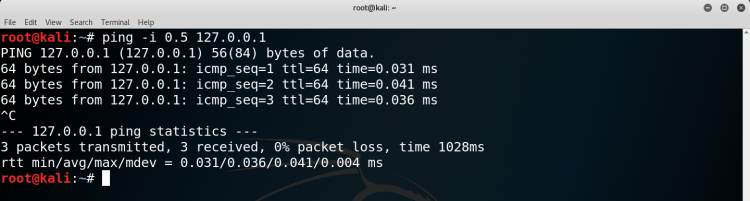
Increase/Decrease interval between ping packets :– The default time interval between sending each packet is 1 second in Linux. You can increase the time interval by setting a value greater than 1 and decrease it by setting a value less than 1.
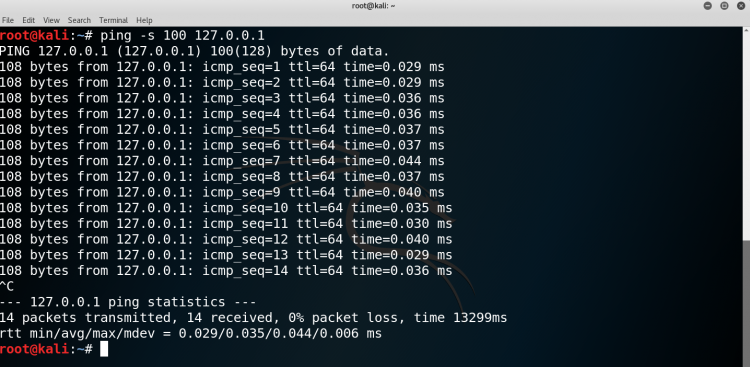
Change ping packet size :- The default ping packet size is 56 bytes.
Set ping timeout :- You can set a time limit after which ping will exit; no matter how many ping packets are sent or received
Set ping to send a desired number of packets :-You can set ping to send a desired number of packets
We can try out many functions.